


How do I clean the laser «Blue-ray»-player?
Dust and other debris can accumulate inside your «Blue-ray»-Player.Over time, player’s lens might be dirty and stop working properly or not work at all.To maintain the lens of your player clean you can buy a kit for cleaning.You should buy a set, collected specifically for the format «Blue-ray», otherwise disk cleaning can damage the lens, the drive, or disturb the player.
Instructions
1.Turn on the «Blue-ray»-players.
2.Insert the disc into your player to clear the down side to the fibers.Wait until the player roll out the disk.
3.Click «Play» to begin the cleaning process.Follow the instructions on your screen.These instructions vary depending on the type of disc for treatment.
4.Upon completion of cleaning, remove the disc from your la «Blue-ray»-Player.

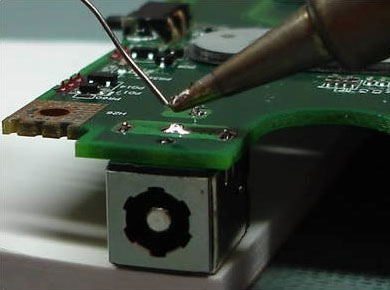
Laptop won’t charge anymore? If you have a loose connection where you plug in the power on your laptop, or it works intermittently, you could have a bad DC Jack!
How to make 32-bit operating system «Windows 7″ 64-bit?
Operating System «Windows 7″ may be 32-bit or 64-bit.The main difference between these two versions of the operating system is the CPU.Processor 32-bit version can detect up to four gigabytes of RAM, whereas the 64-bit processor sees up to 16 gigabytes.To the 32-bit operating system to make the 64-bit, make sure your processor supports 64-bit instruction set.Otherwise, the 64-bit «Windows 7″ will not work.
Instructions
1.Download, install and run the «CPU-Z» (cpuid.com / softwares / cpu-z.html).Click on the tab «CPU», to see the name and model installed in your computer processor.
2.Go to the developer’s site of your CPU and see his model.To find out if your processor is 64-bit instruction set, refer to the information in the fields of “Command Set” or “operating system”.If the processor uses 32-bit instruction set, it means that your computer can not install 64-bit operating system.
3.Copy all personal data from your computer hard drive to any other media, such as a USB-drive.
4.Go to the site developers of your motherboard or computer model to find them.Download the drivers for 64-bit version and burn them to CD.
5.In the optical drive of your computer, insert the installation disk with the operating system «Windows 7.”Restart the computer.Choose your language, locale and keyboard settings.
6.Click “Next” and then “Install”.Read the license agreement corporation «Microsoft», check the box next line “I accept the license agreement.”
7.Click “Next”, “Advanced”.Select the partition on which the 32-bit operating system «Windows 7.”
8.Click “settings hard disk drive (optional).”To start recording, 64-bit operating system on top of a 32-bit version, click “Format” and then “Next”.Do not press any keys on the keyboard, even if you are prompted to do so.
9.On the “Setting up Windows» enter the computer name and account name, then click “Next.”
10.At the request with a password and click “Next.”Enter the license key for your operating system «Windows 7.”Follow the onscreen instructions to complete installation.
11.Click on the “Start” menu.In the search box, type «devmgmt.msc» (without the quotes) and press «Enter», which will open the “Device Manager”.Click on the arrow next to each category to display the installed components.
12.If you find a device marked with a yellow exclamation mark, which means that an error driver for this device.Install 64-bit version of these drivers with your recorded disc.
Notes
To install the driver from the disk, double click the left mouse button on the file extension «. Exe».
Some devices use drivers format «INF».To install the driver click the right mouse button and select “Install”.
What to do if your computer does not turn on?
Computer in modern life – is more than just a technique that helps in the work.Most often, the computer becomes a necessary and indispensable part of life.So when the computer is not included, or set, your computer will not boot, it can seem more than a challenge, especially when urgent work is not completed or other important business.But do not worry about it too much: when the computer fails to start or how to say “computer will not turn on,” you need to concentrate and perform a series of actions that will conduct an independent diagnostic computer to find out possible causes of failure.
Reasons why the computer will not boot, can be set:
the absence of line voltage;
damage the power cord or extension cord;
the failed (burnt) or exhausted the resources of power supply;
defective motherboard;
damaged contact between the cables or components in the system unit;
a virus;
loosely connected loops devices;
improperly installed boards in the system unit;
and dozens of serious and not very reasons why not start your computer up to the accumulated dust inside the system unit.
What should be done to find out the reason why not start your computer?The first thing to check the voltage on the network.To do this, simply plug into an outlet that feeds your computer, automatically working device (such as a desk lamp, kettle).If this device works – supply voltage and there really is “complex” is not loaded for some other reason.
Then, in the same way checks whether the power cord.Sufficient verification test for the first two reasons of malfunction of computers is when the power indicator lights up on the monitor.If it is intermittent flashes (on some models glows a different color) – with electric power all right.
If all the above steps did not bring solution to the problem, you need to call a specialist – Further diagnostic computers can only be a qualified employee of a computer service center.If your knowledge of computer repairs are reduced to the replacement of a mouse or a monitor, do not try to diagnose yourself – you can inflict even greater damage to your computer.Call the customer service computer experts, and expert computer help to hold a full and accurate diagnosis of your computer, identify the reason for not include “complex”.
The only thing you can do more before calling a service to our computer services – is to try to decipher the signals BIOS.
Signals AWARD BIOS
Signal no.Faulty or not connected to the motherboard power supply.
Continuous signal.Faulty power supply.
1 short.No errors.
2 short.Found minor errors.
3 long.Failed Keyboard controller.
1 long + 1 short.Problems with RAM.
1 long + 2 short.The problem with the card.
1 long + 3 short.An error occurred initializing the keyboard.
1 long 9 short +.An error occurred while reading data from the volatile memory chips.
1 long repetitive.Improperly installed memory modules.
A short repetitive.Problems with power supply.
Signals AMI BIOS
Signal no.Faulty or not connected to the motherboard power supply.
1 short.No errors.
2 short.Parity error memory.
3 short.There was a bug in the first 64 KB of main memory.
4 short.Faulty system timer.
5 short.Defective CPU.
6 short.Faulty keyboard controller.
7 short.Faulty motherboard.
8 short.Faulty video memory.
9 short.Checksum error in the contents of chip BIOS.
10 short.Unable to write to the CMOS-memory.
11 short.Defective external cache-memory (installed in the slots on the motherboard).
1 long + 2 short.Faulty video card.
1 long + 3 short.Faulty video card.
1 long + 8 short.Problems with the video card or monitor connected.
Signals PHOENIX BIOS
1-1-3.Failed to write / read data CMOS.
1-1-4.Checksum error in the contents of chip BIOS.
1-2-1.Faulty motherboard.
1-2-2.Error initializing the controller DMA.
1-2-3.Error while trying to read / write to a channel DMA.
1-3-1.Error recovery of memory.
1-3-3.Error when testing the first 64 kB of RAM.
1-3-4.Error when testing the first 64 kB of RAM.
1-4-1.Faulty motherboard.
1-4-2.Failed memory test.
1-4-3.System timer error.
1-4-4.Failed to access I / O port.
3-1-1.Error initializing the second channel DMA.
3-1-2.Error initializing the first channel DMA.
3-1-4.Faulty motherboard.
3-2-4.Failed Keyboard controller.
3-3-4.Test error of video memory.
4-2-1.System timer error.
4-2-3.Error line A20.Faulty keyboard controller.
4-2-4.Error when running in protected mode.Might have a defective CPU.
4-3-1.Error when testing memory.
4-3-4.Real time clock error.
4-4-1.Error testing serial port.The error may be caused by a device that uses this port.
4-4-2.Error when testing the parallel port.The error may be caused by a device that uses this port.
4-4-3.Error when testing math coprocessor.
How to change the forgotten password of the owner of «Windows XP» ?
The account holder, with its root, is created automatically during installation of the operating system «Windows XP», if not created any account.In case of lost password, the owner can retrieve it using the administrator account or with a different account, disposing administrator.The Administrator account is created automatically when you install the operating system «Windows XP».Usually it is not displayed during startup.There are two basic methods of logging in as administrator.If the first method did not bring positive results, use the second method.
Instructions
Access to administrator account – the way first
1.Restart the computer.
2.Hold down the «Ctrl» and «Alt», press «Delete».Repeat pressing a combination of these keys.
3.In the text field “User Name” enter “Administrator” (without the quotes).
4.In the text “Password” field enter the password for the Administrator account.If the account is not password protected, skip this step.
5.To log in as administrator click the “OK”.
Access to administrator account – how second
1.Restart the computer.
2.Once the message disappears «BIOS» Press «F8».A screen with information about the system components of your computer.
3.Using the arrow keys, select “Safe Mode” and then double-press «Enter».
4.Click on the icon the account “Administrator” and then enter the administrator password.If the account is not password protected, then leave it blank.
5.Press «Enter», and then click the “Yes” to login as an administrator.
Change Password
1.Click “Start” menu and then “Run.”
2.Enter in the “Run” command «control userpasswords2» (without the quotes) and click “OK”.
3.In the window “User Accounts” tab, select the “Members”.
4.Click on the icon “Owner”, then click the “Change password”.
5.Enter the new password twice and click “OK”.
Notes
Alternatively, you can use the disk change the password for the account holder.Click the “Use disk password change” after entering the wrong password in the login box, and then follow the instructions.You must press the «F8» before loading the operating system «Windows XP».If you can not enter into the screen “Boot Parameters”, repeatedly press «F8» before loading the operating system.
How do I create a bootable USB-drive in «Windows 7
How do I create a bootable USB-drive in «Windows 7
If you want to create a bootable USB-drive in the operating system «Windows 7″ to start, make sure that you make a backup or delete all the files on your USB-drive, which will be used.You need to reformat this drive, so all your files will be deleted.Also, you should find a «BIOS», is compatible with your computer download function with USB-drive.
Instructions
1.Right click on empty space on your desktop and select “New”, then from the resulting menu, select “Folder.”Give the new folder name.Copy all the files stored on USB-drive to this folder to store them on your hard drive.Your USB-drive should have at least 4GB of free space available.
2.Click on the “Start” menu on the “taskbar” and select “All Programs”.Click “Accessories”, then locate the “Command Prompt” and click the right mouse button.In the menu that appears, click “Run as administrator”.
3.Enter the command «DISKPART» (without the quotes) and press «Enter» key on your keyboard.You will see the message “Boot disk USB».Next, enter the command «LIST DISK» and burn “Disc number” for your USB-drive.
4.Enter the following command and press «Enter» key after each command entered.If the “disk number” for your USB-drive is “Drive One”, then use that number.
SELECT DISK 1
CLEAN
CREATE PARTITION PRIMARY
SELECT PARTITION 1
ACTIVE
FORMAT FS = NTFS
ASSIGN
EXIT
5.Minimize “command line”.To do this click on the icon “-” at the top.Insert the disk with the operating system «Windows 7″ in the optical drive of your computer.Check the letters in the name of your optical drive and USB-drive.Double clicking the left mouse button, open “My Computer” on your desktop and somewhere write these letters.
6.Restore window “command line” and enter the command «D: CD BOOT» and press «Enter» (instead of the letter «D», specify the letter of your optical drive).
7.Enter the command «BOOTSECT.EXE / NT60 H:» (instead of letter “H” indicate the letter of your USB-drive).Copy all files from the installation disk with the operating system «Windows 7″ on USB-drive.Close the “Command Prompt”.Remove the disc from your optical drive and restart your computer.
8.Log in «BIOS» Press «F10», «Delete» or «ESC».Using the appropriate keys, follow the instructions for navigating «BIOS».You should change the boot order so that the first boot from USB-drive.Press «ESC» to save the settings and exit «BIOS»
How to speed up the webcam?
These days, most laptops have built-in webcam, as well as some desktop computers.If your computer does not have built-in webcam, you can buy an external.When people think of the webcam, the first thought is a video chat, but in reality, the webcam can be used as a surveillance camera to work, as well as for entertainment.If you feel that your webcam is slow, here are some tips to speed up its work.
Instructions
1.Check all connections, if you use an external webcam.Make sure that «USB»-cable is firmly connected into the appropriate slot on your computer.Examine the cable for damage.If you think that the whole point of the cable, try replacing it with another «USB-cable, or plug the cable into another port on your computer.
2.Update your drivers.Drivers can communicate with external devices to your computer.Slow webcam may be the result of outdated drivers.Find the model of your webcam or your computer (if you have a built-in camera) and go to the official website developers, find the right driver and download it.After downloading the driver you need to install and test the performance of your camera.
3.Uninstall and reinstall the camera and drivers for it.If you are still experiencing difficulties related to the speed of the webcam, go to “Device Manager” and delete from there webcam.It will also remove the drivers and your camera.Commutes and camera drivers for it.
4.Close all unnecessary programs.When the program is open, it uses the resources of computer processor and operating memory, even if you do not use this program.To free up more resources for your webcam, you should close all programs that you do not need at the moment.When you minimize the program resources were not released.
5.Check the refresh rate of your webcam.Most modern cameras can produce 60 frames per second, but during the data transfer on the Internet this number can be significantly reduced.Make sure that set the maximum refresh rate to reduce delays in the image.
6.Switch to high-speed Internet.Any person using video chat on the Internet must use a high-speed connection to the normal display of his interlocutor.«Dial-Up»-connection can not provide proper screen refresh rate, so the people that use this type of connection are faced with challenges such as fading images.Make sure you and your partner use a high-speed connection for maximum comfort video chat.
How to edit a PDF format document?
PDF documents are virtually indispensable when using the computer for work.In the end, the majority of scanned documents have the extension «. Pdf».Lack formatting just scanned document a little depressing, but fortunately, there are programs to edit text in those files, and can even seize certain parts of the document.Such programs are easily downloaded from the Internet, as they are easy to use.
Instructions
1.Start with the boot process «Nitro PDF Professional» the official developer’s site on your computer (to do this, go tolink.)Once you have downloaded from the Internet, follow the instructions on installing it.When finished, open the program.
2.Click the icon “Open” at the top of the window.Locate and open the file format of PDF, you want to edit.
3.Click the tab “Insert / Edit” at the top of the window.After this, select “Paste”, which is located in the “Text”.Above this option is a large icon «Ti».
4.Highlight the text that you want to edit.You can also delete or add text in any area of the document.To edit the text, right click on the desired site.In the resulting menu, select “Edit Text”.Then simply edit your text as if you worked in a simple text editor.
5.Use different settings to add charts, pictures and other objects in your file PDF.In most cases, you simply need to edit the file format of PDF, but the program «Nitro PDF Professional» allows you to do much more.
6.Saving a document is, as in any other text editor (press Ctrl + «Ctrl + S» or click the icon “Save” at the top of the window).
Advice
Pay attention to the fact that the program «Nitro PDF Professional» can be used free of charge within two weeks.After this period you must purchase this software if you want to use them in the future.
How to determine the rate of return and to receive data from the Internet?
For those wishing to determine the speed of downloading information from the Internet, there are several services available that meet this need.These online applications in a short time will be given to you not only information about your speed and efficiency of the reception of data, but also give you information on bandwidth, delay and distance between the point of connection to the Internet and the location of the test server.These applications do not require a computer and accessible through any Internet browser.
Instructions
1.Connect to the Internet and open your browser.Enter the address of the tester site in the address bar of your browser, for example speedtest.net.
2.Click the necessary button to begin the test.Stop all the downloading and file sharing, close all programs before starting the test.
3.Wait for the test.In most cases, you can monitor your speed and efficiency of the reception of data during the test itself.At the end of the test, you can see the results, as well as be able to save them.
How to change the image of the Welcome screen in Windows 7 ?
Welcome Screen «Windows» appears at startup.In «Windows 7″ this screen consists of a blue background and the logo of the operating system.If you are tired of this welcome screen, and you want to replace some or other image, you can make this venture without third party programs.
Instructions
1.Click on the “Start” menu and enter a search string «regedit» (without the quotes) and press «Enter», to open the Registry Editor.
2.Right-click on the line «HKEY_LOCAL_MACHINE» on the left side of the editor and select “Find”.
3.In the search box, type «OEMBackground» (without quotation marks), check the box next to “settings” and click “Next.”Registry Editor will provide the necessary parameters.
4.Double left click on the selected value.Window opens «DWORD».
5.In this window, change the value to “1” and click the “OK”.
6.Close the Registry Editor.
7.Open the folder «C: \ Windows \ System32 \ Oobe».
8.Right-click an empty space in the folder and select “New Folder”.If prompted, confirm, click “Continue”, then give the folder a name «info».
9.Double left click on the newly created folder «info».Right-click an empty space in the folder and select “New Folder”.If prompted, confirm, click “Continue”, then give the folder a name «background».
10.Rename the image you want to see at boot time in «backgroundDefault.jpg».Note that the picture must have the extension «. JPG», and its size should not exceed 256 KB.
11.Drag the image into the folder you created earlier «background».
12.Restart your computer.The Welcome screen has disappeared, and his Mete now is your picture.
Notes
Changing the registry is a technical process, and improper editing can lead to system-wide breakdown.Therefore, novice users should not attempt to change the picture a welcome screen.
- Untitled
- What is catfishing and what can you do if you are catfished?
- Untitled
- Untitled
- Untitled
- Untitled
- Untitled
- Untitled
- CEOs of Meta, X, Discord, TikTok and Snap testify before the Senate Judiciary Committee
- Untitled
- Untitled
- Mark Zuckerberg apologizes to families over social media harms in contentious Senate hearing
- Untitled
- Untitled